Configuring VSCode for building/debugging CUDA code on Linux
Recently I have been migrating away from JetBrains IDEs in favor of VSCode .. because of it’s excellent multi-language support … (with JetBrains it seems you almost need a different IDE for every language these days). With VSCode I can create projects with C/C++/Java/Scala/Python/Go/BASH/whatever code all in one shot - it’s great! This weekend I wanted to mess around with CUDA, so I looked into how to go about setting up that toolchain in VSCode.
Note: This post assumes a few things:
- you are running this on a machine that has an NVIDIA GPU
- the machine has the latest NVIDIA Driver installed
- the machine has the NVIDIA CUDA Toolkit installed
I also grabbed the CUDA Examples source code and made a VSCode workspace at the top-level folder.
Ok so back to VSCode - eventually I got it working by adding a few custom json settings files to my workspace:
First of all, CUDA source code files have .cu and .cuh extensions… the syntax is basically C++ but with some minor additions (such as the triple < .. > brackets that mark device code blocks), so to get syntax highlighting ‘mostly working’ on those file types I added the following to my settings.json:
CTRL+SHIFT+P: Preferences: Open Settings (JSON)
"files.associations": {
    "*.cu":"cpp" ,
    "*.cuh":"cpp"
}
Next I had to tell VSCode how to build these files - CUDA comes with it’s own modified version of gcc, called nvcc, so what you do is create a build task:
tasks.json:
{
    "version": "2.0.0",
    "tasks": [
        {
            "type": "shell",
            "label": "CUDA C/C++: BUILD active file",
            "command": "nvcc",
            "args": [
                "-g",
                "-G",
                "-ccbin",
                "g++",
                "-m64",
                "-gencode",
                "arch=compute_75,code=sm_75",
                "${file}",
                "-I${workspaceFolder}/Common",
                "-o",
                "${fileDirname}/${fileBasenameNoExtension}"
            ],
            "options": {
                "cwd": "${workspaceFolder}"
            },
            "problemMatcher": ["$gcc"],
            "group": {
                "kind": "build",
                "isDefault": true
            }
        },
        {
            "label": "CUDA C/C++: RUN active file",
            "type": "shell",
            "command": "${fileDirname}/${fileBasenameNoExtension}",
            "dependsOn": [
                "CUDA C/C++: BUILD active file"
            ],
            "problemMatcher": ["$gcc"]
        },
        {
            "label": "CUDA C/C++: PROFILE active file",
            "type": "shell",
            "command": "/usr/local/cuda/bin/nvprof ${fileDirname}/${fileBasenameNoExtension}",
            "dependsOn": [
                "CUDA C/C++: BUILD active file"
            ],
            "problemMatcher": ["$gcc"]
        }
    ]
}
This allows me to quickly build the active .cu file, targeting my Turing compute 7.5 GPU (also note the addition of the -G flag)
I also added two additional tasks, one to build then RUN the active file and another to build then PROFILE the active file
(using the NVidia nvprof profiler)
Any of the tasks defined above can be run by going to the Terminal menu and selecting Run Task
For debugging, CUDA has it’s own modified version of gdb (cuda-gdb), so now we need a launcher:
launch.json:
{
    "version": "0.2.0",
    "configurations": [
        {
            "name": "CUDA C/C++: build and debug active file",
            "type": "cppdbg",
            "request": "launch",
            "program": "${fileDirname}/${fileBasenameNoExtension}",
            "args": [],
            "stopAtEntry": false,
            "cwd": "${workspaceFolder}",
            "environment": [],
            "externalConsole": false,
            "setupCommands": [
              {
                "description": "Enable pretty-printing for gdb",
                "text": "-enable-pretty-printing",
                "ignoreFailures": true
              }
            ],
            "preLaunchTask": "CUDA C/C++: BUILD active file",
            "miDebuggerPath": "/usr/local/cuda/bin/cuda-gdb"
          }
    ]
}
What this does is first, builds the code by calling the CUDA build task referenced in preLaunchTask and then invokes cuda-gdb on
the resulting binary .. because we specified -g (host debug symbols) and -G (device debug symbols), breakpoints are
now hit not only in the CPU (host) code, but also in the CUDA Kernel (device) code …. just hit F5 from your .cu source window
and you should land in the debugger!
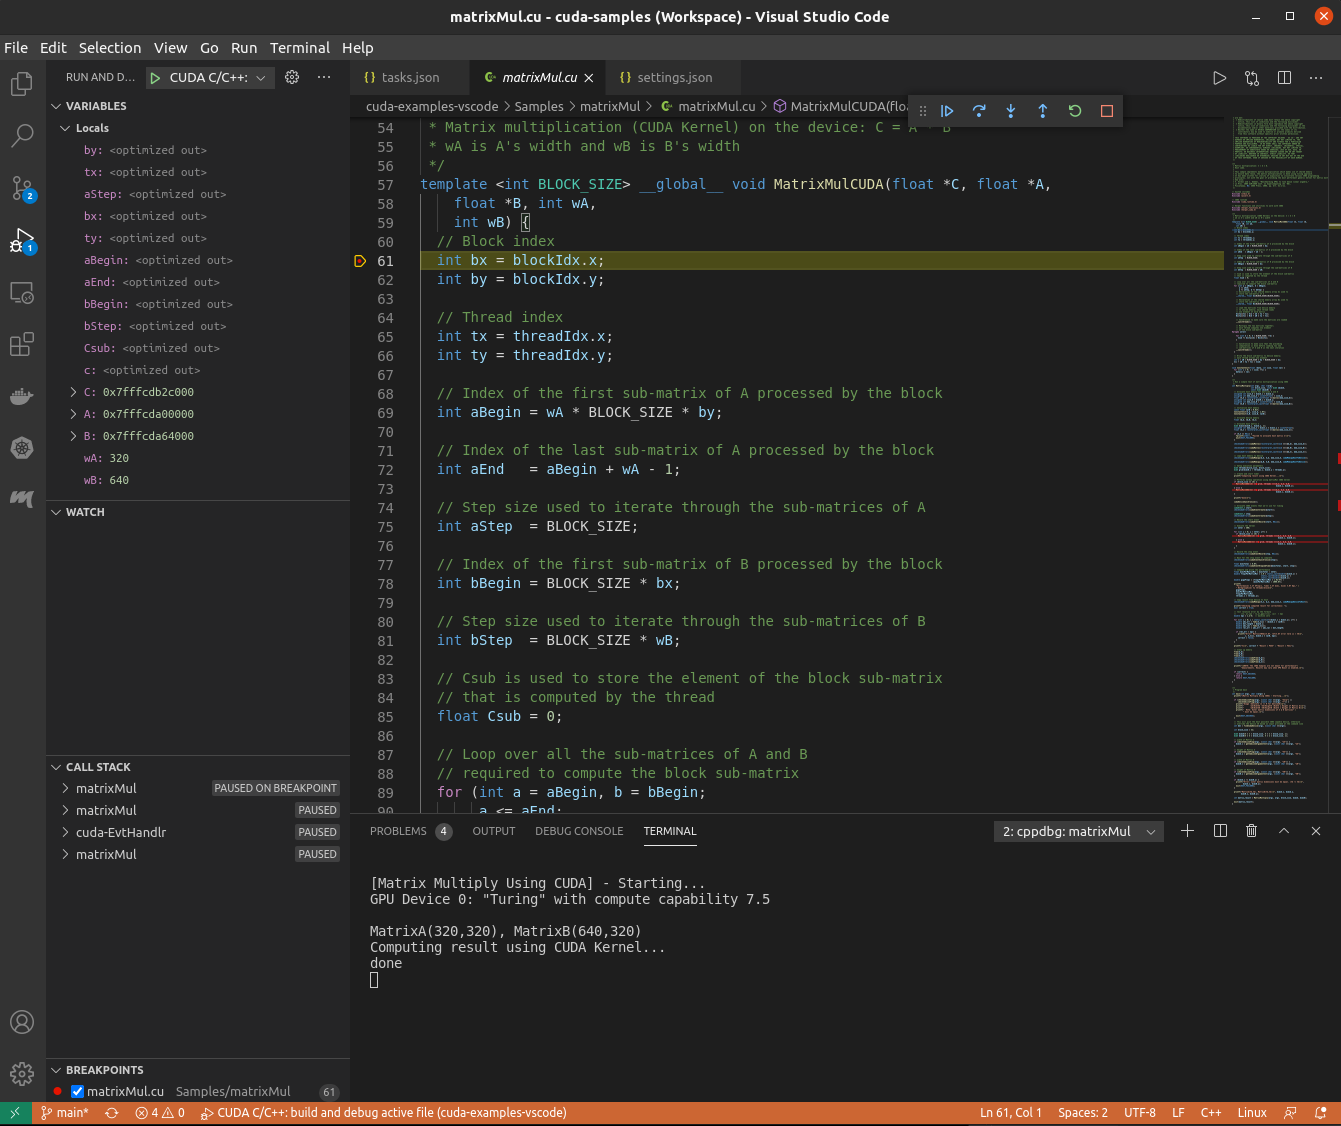
Another WIN for VSCode !
TROUBLESHOOTING
On my Ubuntu 20.04 box, I had libncurses6 packages installed by default. I also use CUDA 11.0 (as that currently works well with Tensorflow).
However, initially I wasn’t able to get cuda-gdb to run because of it’s dependencies:
aaron@blade:~$ ldd `which cuda-gdb`

linux-vdso.so.1 (0x00007ffc16f4e000)
libtinfo.so.5 => /lib/x86_64-linux-gnu/libtinfo.so.5 (0x00007f36fe8fe000)
libncursesw.so.5 => /lib/x86_64-linux-gnu/libncursesw.so.5 (0x00007f36fe8cc000)
libdl.so.2 => /lib/x86_64-linux-gnu/libdl.so.2 (0x00007f36fe8c6000)
libm.so.6 => /lib/x86_64-linux-gnu/libm.so.6 (0x00007f36fe777000)
libpthread.so.0 => /lib/x86_64-linux-gnu/libpthread.so.0 (0x00007f36fe754000)
libc.so.6 => /lib/x86_64-linux-gnu/libc.so.6 (0x00007f36fe562000)
/lib64/ld-linux-x86-64.so.2 (0x00007f36fe947000)
as you can see it depends on libncurses5, so you may need to install that too, for example:
sudo apt-get --reinstall install libncurses5 libncursesw5